Adjusting luminosity and overall color (Continued)
Now, I'm going to make a suggestion that you don't have to follow. You can either lighten the background of the entire image, or you can choose to lighten just the area inside your sketch circle. I prefer to lighten inside the sketch circle only. The reason is that as long as I'm doing this, why not take advantage of the fact that the view through the eyepiece usually shows some glow to the background sky compared to the non-visual part of the eyepiece. (I don't own a Nagler, so I don't know what it means to not have a non-visual area in my eyepiece ;-) I leave it up to you. I think it makes up a little bit for the fact that you no longer have that striking pure black background. I like consolations.
Selecting just the circle can take a little bit of fiddling. First, grab the oval selection tool. Then move your cursor as close to the center of your sketch circle as possible and hold the option/alt and shift keys and start dragging out a circle. (The shift key constrains the oval to a perfect circle. The option or alt key causes the circle to originate from the center rather than diagonally from one side.) Your circle probably isn't perfectly centered, but size it as close to the size of your sketch circle as possible and then drag it around until it is centered. If it is too big or small, you can redraw it, or you can go to the "Select" menu, then to the "Modify" submenu and choose either "Expand..." or "Contract..." and enter 1 or more pixels in the box to enlarge or reduce your circle. Once the selection circle encompasses your sketch circle, you are ready to work some magic on the image. If you aren't sold on the idea of adjusting only the circle, then you just saved yourself a little bit of time. :D
Figure 16: Dragging the selection circle from the center outward

At this point, we have a choice of two prominent means of adjusting the tonal range of your image: Levels or Curves. I prefer to use curves, because they provide an incredible amount of flexibility in how you adjust the values of your image. But because the learning curve (eheh) is heavier, we'll keep the discussion to the use of Levels. In a later tutorial, I'll address curves. They are incredible.
Before I forget--now would be a good time to grab your sketch pad or observation record sheet so you can compare the tonality of the digital image to what you tried to convey with pencil and paper at the telescope. Refer to it as you adjust the image to decide what enhancements you need to focus on.
OK, back to the computer. Go to the "Image" menu to the "Adjustments" submenu, and select "Levels..." You will now see a composite histogram that shows where the tonal values of your image reside. At the bottom of the menu is a shaded bar that goes from dark to light (Fig. 17, A) that represents which side of the histogram represents which shades. In the large window above you will see what looks like a black mountainous profile (Fig. 17, B). If your image is a positive DSO sketch, that mountain should be piled up above the dark portion of that shaded gray bar. The reverse will be true of a negative DSO image. This is telling you what proportion of the pixels in your image are black, white and whatever shade of gray in between. The taller the black mountain, the more pixels there are at that part of the tonal range.
Figure 17: Levels dialog window
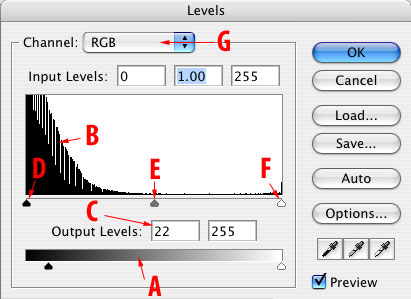
The first thing we want to do is change the low value in the "Output Levels" section (Fig. 17, C). Right now it says "0". This means that the darkest dark possible is a perfect black of zero. I would suggest raising it to a value between 20 and 30. If you are working on an image with nebulosity, you may be pleased to see an immediate improvement in the visibility of dimmer portions of the image. You have just brightened the darkest darks a small amount, allowing any slight increase in brightness from absolute black to be easier to see. Depending on how light or dark your overall scan was, you may need to lower these numbers. You don't want your sketch to look like it is plagued with light pollution.
Figure 18A: Shadow output level set to 10
Figure 18B: Shadow output level set to 20

Figure 18C: Shadow output level set to 30

The next step is to play with the three arrows beneath the histogram. We will treat them separately below.
PAGE 4 OF 7
-- First Page | Previous Page | Next Page --


Jeremy, I'm really new at this and trying to work my way through it. I have the older Photoshop 6.0 Can I crop with the circle like I do with the cropping tool? With the cropping tool I just double click with the cursor inside the box. This doesn't seem to work with the circle.
Thanks for your help,
Dick
Hi Dick, Photoshop will only crop to a rectangular shape. You can make a circular selection (with the dashed selection tool instead of the crop tool) and then go to Image > Crop, but you will still end up with a square that's as wide and tall as the circle. So I don't think this will do what you want.
If you want to make the area outside your sketch circle black or white or anything else, you will first need to use the circular selection tool to select your sketch circle. Then go to: Select > Inverse...(you could also use keyboard command ctrl-shift-i on pc or command-shift-i on the mac). This will select the area outside the circle. Then go to Edit > Fill, select a color, and click OK to fill the outside area with a different color.
I don't have Photoshop 6 anymore, so the menu locations may be a bit different, but those basic functions should still be there.
There are a variety of other ways to do the same thing (with layers and masks), but this is probably the easiest to get started. Let me know if that's what you are trying to do and if it works for you!
[EDIT OCT 1, 2010]: Message edited to correct some instructions.
OK, Jeremy, thanks for the reply. What I am trying to do is circle my sketch so it will look like looking in the eyepiece. I would like a black background when I have a "negative" sketch and a white background when I have white stars on black field. When I go to Image > Adjust > Invert then I get an error message: Could not complete the invert command because the selected area is empty. If I go on with the Edit > Fill > select a color (black) > OK then my center goes black, just the opposite of what I'm trying to go. BUT, I really getting close thanks to your help! Dick
Hi Dick, I'm sorry for the delay, and even more sorry for giving you the wrong advice. I accidentally gave you the command for switching a positive image to negative.
Try this instead:
Go to the Select menu and click "Inverse". That's actually what is needed to change the selection area to outside the circle.
Please let me know if that works for you, and sorry for pointing you in the wrong direction.
Jeremy